
The perfect steak doesn’t have to be high stakes. Learn all about grilling steaks so that they come out beautifully every time.
Learning how to grill the perfect steak is the first—and maybe most important—step in achieving summer backyard grilling cred. Of course, it’s all about hitting that sweet spot of gorgeous exterior char with perfectly cooked tender, juicy middle. But never fear—that balancing act is easy to achieve with a few simple strategies. Follow this guide, and you’ll be ready to enjoy countless carnivorous feasts all summer long.
All About Grilling Steaks
1. Select Your Steak
Always go for well-marbled steaks—that extra fat enhances flavor and promotes tenderness. Here are our favorite options, both thick and thin:
The thick cuts
Pick up these cuts at the butcher, where you can request steaks that are 1 1/2-2 inches thick for maximum juiciness.
Ribeye: This is a flavorful, extremely well-marbled cut of meat comes from the middle of the cow, in the rib section. Because of its high-fat content, ribeye is extra flavorful and beefy. However, also because of the large amount of fat, ribeye needs to be trimmed—and watch out for grill flare-ups.
Strip Steak: Also called New York Strip, a Kansas City Strip, or Top Sirloin, this tender, somewhat chewy cut comes from the rear of the cow, just behind the ribs. Its beefy flavor isn’t as pronounced as the ribeye, but it’s still well marbled and doesn’t need to be trimmed as much. This steak is easier to grill because you won’t have to deal with any potential flare-ups.
T-bone: The t-shaped bone that gives this steak its name joins two types of steak: Tender tenderloin and richer, chewier strip steak. When you grill t-bone, you’ll want to make sure that the tenderloin (the less-marbled side) is positioned further away from the direct heat source and the strip side closer to the heat, because the tenderloin will cook more quickly.
The Thin Cuts
These steaks might be thin, but they’re especially rich in flavor and offer an addictive chewy texture—a great option if you’re shopping at the supermarket.
Flank: The flank steak comes from the hard-working belly of the cow, near the back leg, and is rich in flavor. To maximize tenderness, always serve flank steak sliced, and be sure to cut it against the grain.
Hanger: This cut comes from the front of the belly of the cow—the part that “hangs” down. Hanger has a strong beefy flavor and is especially good for marinating, since it has looser muscle fibers that will soak in flavor.
Skirt: The skirt comes from the diaphragm of the cow. It’s a very thin cut with plenty of fat, so it takes especially well to high-heat searing. It’s important to slice skirt steak against the grain for tenderness, too.
2. Season Your Steak and Refrigerate
You’ll want to season the steak with salt a few hours before grilling steaks. Follow this simple rule of thumb from grilling expert Meathead Goldwyn: Season the steak with 1/2 teaspoon of kosher salt (or 1/4 teaspoon of table salt) per pound of meat and refrigerate for 1 to 2 hours. “You do not need to rinse off excess salt. It will all be sucked into the meat.” The salt acts as a dry brine, helping the meat stay juicy throughout the cooking process.
For thinner, tougher cuts like skirt, hanger, or flank steak that come from muscular parts of the cow, you can also use a marinade instead. Consider adding sugar into the mix—it’s a secret trick for tenderizing tougher cuts.
Make sure to remove the meat from the refrigerator about 20 minutes prior to grilling steaks so they don’t have a chill on them before you throw them on the grill.
3. Prep Your Grill
No matter what kind of steak you’re cooking, we recommend setting up a two-zone grill. Two zones means two temperatures, which means more control over how your food cooks. You’ll build one area of intense, direct heat and one area of less hot, indirect heat. This set-up works for both gas and charcoal grills: For gas, simply fire up the heat on one side of the grill and leave the other side alone. For charcoal, arrange the lit, ashed-over coals (lit with a chimney starter, of course) on one side of the grill.
4. For Thin Steaks, Sear Over Direct Heat
For steak that’s less than 1 1/2 inches thick, simply grill the steak over the direct heat until it reaches the desired temperature, flipping the meat about every minute. This will ensure that the surface browns evenly throughout, and that the middle of the steak won’t cook too quickly or unevenly. Take the steak off of the grill once it hits your target temperature (see below). Let rest for 5 minutes before slicing and/or serving.
5. For a Thick Steak, Use the Reverse Sear Method
For steak that’s 1 1/2 inches thick or more, the best strategy to ensure meat that’s perfectly charred on the outside and cooked to desired doneness in the middle is the reverse sear. You’ll cook the steak until it’s almost at the desired doneness over indirect heat, then move it over the hotter direct-heat section of the grill for a final quick sear.
First, make sure the indirect-heat section of the grill is around 225°F (use a grill thermometer with a clip to check), add the steak to that cooler part of the grill, and then cover the grill. “When the lid is down, hot air circulates around it, and you can gently warm the meat so that from top to bottom, it’s the same temperature and color,” Goldwyn said. You’re basically creating an oven for your meat.
Start checking the temperature of the steak after about 15 minutes (the meat will look tan, not browned), and continue checking every 5 minutes, until the internal temperature of the steak is 10-15 degrees below your target temperature (about 120°F for a medium-rare 1 1/2 inch steak). Once the food hits that temperature, it’s ready to move to the direct-heat side for a quick sear.
Next, you want to crank up the heat. Remove the steak to a plate and set aside. For a gas grill, close the lid and turn all the burners to high heat for a few minutes. For a charcoal grill, gather the lit coals into a pile or add half a chimney’s worth of fresh lit coals to concentrate the heat.
Move the steak to the direct-heat zone, flipping the steak every minute (as Goldwyn says, “like a human rotisserie”) to ensure that your meat browns evenly all the way around. Take the grilling food off of the grill once it hits your target temperature (see below). Let rest for 5 minutes before slicing and/or serving.
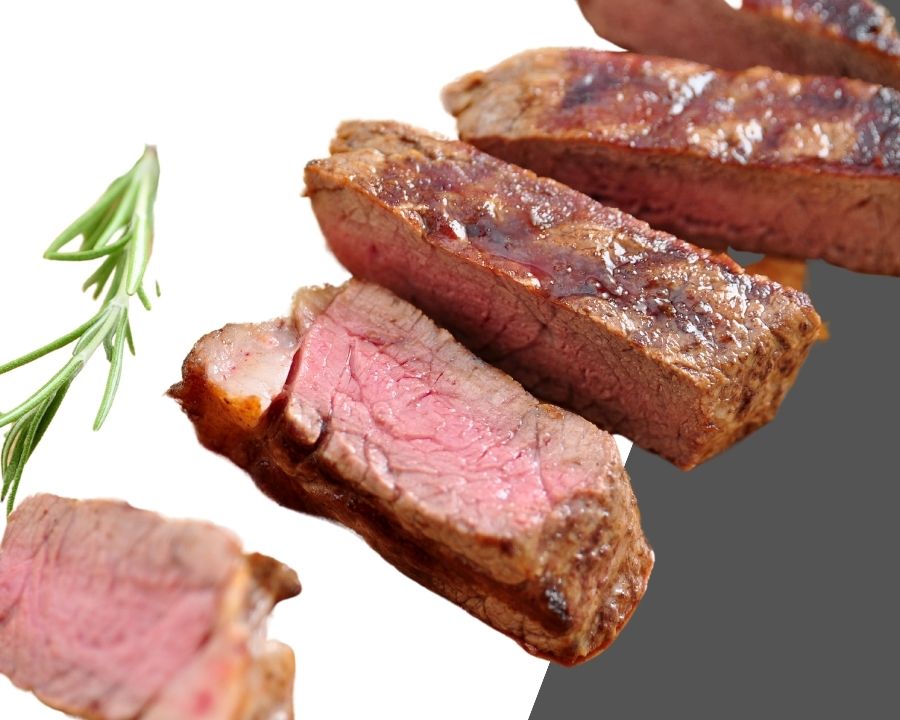
6. Hit the Desired Doneness Temperature
The internal temperature of the meat will rise another 5 degrees as the meat rests, bringing it to the ideal final doneness you desire.
Rare: 115°–120°F
Medium Rare: 120°–125°F
Medium: 130°–135°F
Medium Well: 140°–145°F
Well Done: 150°F and above
This steak with radishes and black pepper is hot off the grill and ready to eat.
Hirsheimer & Hamilton
7. Let the Steak Rest Briefly, Then Serve
“You always want to account for carryover cooking in the time that it takes to get the steak off of the grill and on the table,” says Epi Food Director Rhoda Boone. Let the meat rest for about 5 minutes, and it’ll be ready to slice or serve whole so that your hungry guests can attack it with their own knives. (Although one grilling expert thinks you shouldn’t let the meat rest at all!)
Now that you’ve learned all about grilling steaks, dress it up and add variety with delicious sauces, marinades, and spices. And don’t forget the sides!
Source: Epicurious